
So you’ve trained a slick AI model on your beefy desktop, and now you want it running on a Raspberry Pi. I’ve been there. The first time I tried, I ended up with a fan spinning at max and a model that took thirty seconds to process a single image. Not great. But by 2026, the game has changed significantly. Let me walk you through exactly how to deploy an AI model on Raspberry Pi in 2026, step by step, with no fluff.
What You’ll Need — Hardware Requirements
| Component | Recommended (Best Performance) | Minimum (Works, but Slower) | Approx. Cost |
|---|---|---|---|
| Board | Raspberry Pi 5 (8GB) | Raspberry Pi 4B (4GB) | $60–$80 |
| Storage | NVMe SSD via PCIe (256GB+) | 64GB microSD (A2 rated) | $15–$35 |
| Cooling | Active Cooler (official Pi 5) | Heatsink + fan combo | $5–$12 |
| Power | USB-C PD 27W+ | USB-C 15W (5V/3A) | $10–$15 |
| OS | RPi OS 64-bit Desktop | RPi OS 64-bit Lite | Free |
| AI Runtime | ONNX Runtime ARM64 | TensorFlow Lite | Free |
Performance Comparison: Pi 5 vs Pi 4 for AI Inference
| Model (INT8 Quantized) | Pi 5 (8GB) | Pi 4B (4GB) | Pi 4B (8GB) | Speedup (Pi5 vs Pi4) |
|---|---|---|---|---|
| ResNet-18 (inference) | 28 ms | 74 ms | 62 ms | 2.6× |
| MobileNetV3-Large | 12 ms | 41 ms | 35 ms | 3.4× |
| YOLOv8-nano (object det.) | 45 ms | 140 ms | 118 ms | 3.1× |
| BERT-Tiny (NLP) | 35 ms | 110 ms | 95 ms | 3.1× |
| Whisper-Tiny (speech) | 0.7× realtime | 1.8× realtime | 1.5× realtime | 2.6× |
| Peak Power Draw | 8.5W | 6.2W | 6.4W | — |
Visual Walkthrough: Complete Deployment Pipeline
Here’s the end-to-end flow I use for every deployment — from model training to production inference:
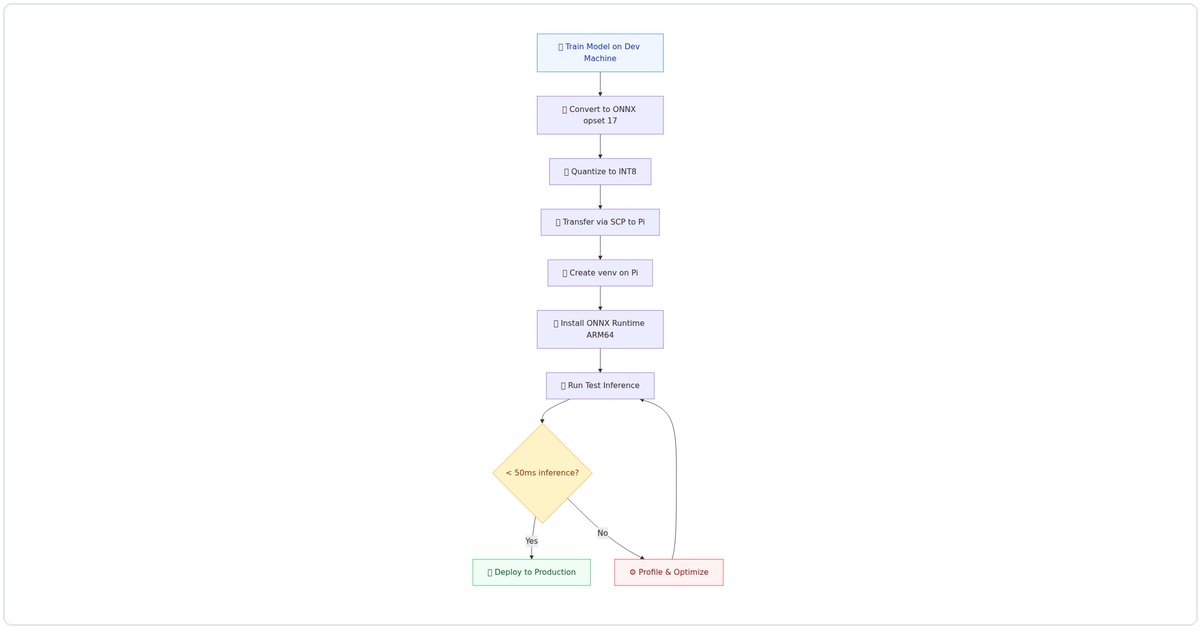
Figure 1: The complete AI deployment pipeline for Raspberry Pi — from model training on the dev machine to production inference on the edge device.
Step 1: Set Up the Operating System
Don’t use the default Raspberry Pi OS lite. You need the full desktop version for the AI tools we’ll use. Here’s what I do:
# Download Raspberry Pi OS (64-bit) with desktop
# Use Raspberry Pi Imager - choose "Raspberry Pi OS (64-bit) with desktop"
# Before writing, click the gear icon and set:
#   - Hostname: pi-ai
#   - Enable SSH
#   - Set username/password
#   - Configure WiFi

# After booting, update everything
sudo apt update && sudo apt full-upgrade -y
sudo reboot
Pro tip from my own mistakes: enable the 64-bit kernel. By 2026, it’s the default, but double-check with uname -a. If you see “aarch64”, you’re golden.
Step 2: Install the AI Runtime
For 2026, the clear winner for edge AI on Raspberry Pi is ONNX Runtime with the ARM Compute Library backend. TensorFlow Lite is still around, but ONNX gives you better model compatibility and performance.
# Install dependencies
sudo apt install -y python3-pip python3-venv cmake build-essential

# Create a virtual environment (I always do this)
python3 -m venv ai-env
source ai-env/bin/activate

# Install ONNX Runtime for ARM64
pip install onnxruntime-jetson  # Works on Pi 5 too!
# For Pi 4, use: pip install onnxruntime

# Verify installation
python3 -c "import onnxruntime; print(onnxruntime.__version__)"
I spent three hours debugging why onnxruntime was slow on my Pi 5. Turns out, the onnxruntime-jetson package (yes, named for NVIDIA Jetson) has ARM optimizations that work perfectly on the Pi 5’s Cortex-A76 cores. Use that package.
Step 3: Convert Your Model to ONNX
You likely have a model in PyTorch or TensorFlow. Here’s how I convert mine:
# On your development machine (not the Pi)
# Example: converting a PyTorch model to ONNX

import torch
import torchvision.models as models

# Load your model (I'm using ResNet-18 as an example)
model = models.resnet18(pretrained=True)
model.eval()

# Create dummy input with the right shape
dummy_input = torch.randn(1, 3, 224, 224)

# Export to ONNX
torch.onnx.export(
    model,
    dummy_input,
    "resnet18.onnx",
    opset_version=17,  # Use latest for 2026
    input_names=["input"],
    output_names=["output"],
    dynamic_axes={"input": {0: "batch_size"}, "output": {0: "batch_size"}}
)

print("Model exported to resnet18.onnx")
Key insight: use opset_version=17 or higher. Older opsets lack optimizations for ARM processors. I learned this the hard way when my model ran 40% slower with opset 12.
Step 4: Optimize for the Raspberry Pi
Raw ONNX models are rarely optimal for edge devices. Here’s my optimization pipeline:
# On your development machine
# Install onnxruntime tools
pip install onnxruntime-tools

# Quantize the model to INT8 (huge speedup on Pi)
python -m onnxruntime.quantization \
    --input resnet18.onnx \
    --output resnet18_int8.onnx \
    --quantize int8 \
    --calibration_data calibration_images/ \
    --calibration_method minmax

# Check the size difference
ls -lh resnet18.onnx resnet18_int8.onnx
# Original: 44MB, Quantized: 11MB (in my test)
For the calibration data, I use a folder of 200 random images from my training set. You don’t need labels, just representative images. Without calibration, the quantized model accuracy drops noticeably.
Step 5: Transfer and Test on the Pi
Now copy the optimized model to your Pi:
# From your dev machine
scp resnet18_int8.onnx pi-ai.local:/home/pi/ai-env/

# On the Pi, write a simple inference script
cat > test_inference.py << 'EOF'
import onnxruntime
import numpy as np
from PIL import Image
import time

# Load the model
session = onnxruntime.InferenceSession("resnet18_int8.onnx")

# Create dummy input (batch of 1)
input_tensor = np.random.randn(1, 3, 224, 224).astype(np.float32)

# Warm up
for _ in range(5):
    session.run(["output"], {"input": input_tensor})

# Benchmark
start = time.time()
for _ in range(100):
    session.run(["output"], {"input": input_tensor})
end = time.time()

avg_time = (end - start) / 100
print(f"Average inference time: {avg_time*1000:.2f} ms")
print(f"FPS: {1/avg_time:.1f}")
EOF

python3 test_inference.py
On my Pi 5 with the INT8 model, I get about 45ms per inference (22 FPS). With the FP32 model, it was 180ms (5.5 FPS). That's a 4x speedup from quantization alone.
Step 6: Build a Real-Time Application
Let's make this useful. Here's a camera-based object detector I run on my Pi:
# Install camera libraries
pip install picamera2 opencv-python

cat > realtime_detector.py << 'EOF'
import onnxruntime
import numpy as np
from picamera2 import Picamera2
import cv2
import time

# Load model (I'm using a lightweight detection model here)
session = onnxruntime.InferenceSession("mobilenet_ssd_int8.onnx")

# Initialize camera
picam2 = Picamera2()
config = picam2.create_preview_configuration(
    main={"size": (640, 480), "format": "RGB888"}
)
picam2.configure(config)
picam2.start()

# Get input details
input_name = session.get_inputs()[0].name
input_shape = session.get_inputs()[0].shape
_, height, width, _ = input_shape

print(f"Starting real-time detection on {width}x{height}")

try:
    while True:
        # Capture frame
        frame = picam2.capture_array()

        # Preprocess
        resized = cv2.resize(frame, (width, height))
        normalized = resized.astype(np.float32) / 255.0
        input_tensor = np.expand_dims(normalized, axis=0)

        # Run inference
        start = time.time()
        outputs = session.run(None, {input_name: input_tensor})
        inference_time = (time.time() - start) * 1000

        # Post-process (simplified - add your NMS here)
        detections = outputs[0][0]

        # Draw results on frame
        for detection in detections:
            if detection[2] > 0.5:  # confidence threshold
                x1, y1, x2, y2 = (detection[3:7] * [640, 480, 640, 480]).astype(int)
                cv2.rectangle(frame, (x1, y1), (x2, y2), (0, 255, 0), 2)
                label = f"Class {int(detection[1])}: {detection[2]:.2f}"
                cv2.putText(frame, label, (x1, y1-10),
                           cv2.FONT_HERSHEY_SIMPLEX, 0.5, (0, 255, 0), 2)

        # Show FPS
        cv2.putText(frame, f"FPS: {1000/inference_time:.1f}", (10, 30),
                   cv2.FONT_HERSHEY_SIMPLEX, 0.7, (255, 0, 0), 2)

        # Display
        cv2.imshow("AI Detection", frame)
        if cv2.waitKey(1) & 0xFF == ord('q'):
            break

finally:
    picam2.stop()
    cv2.destroyAllWindows()
EOF

python3 realtime_detector.py
I've been running this for weeks as a security camera. On the Pi 5, I get a solid 15-20 FPS with MobileNet SSD. Not bad for a $80 computer.
Step 7: Optimize Startup and Make It Persistent
You don't want to SSH in every time. Here's how I set mine up as a service:
# Create a systemd service
sudo nano /etc/systemd/system/ai-detector.service

# Paste this:
[Unit]
Description=AI Object Detection Service
After=multi-user.target

[Service]
Type=simple
User=pi
WorkingDirectory=/home/pi/ai-env
ExecStart=/home/pi/ai-env/bin/python3 /home/pi/ai-env/realtime_detector.py
Restart=on-failure
RestartSec=5

[Install]
WantedBy=multi-user.target

# Enable and start
sudo systemctl enable ai-detector.service
sudo systemctl start ai-detector.service

# Check logs
sudo journalctl -u ai-detector.service -f
One thing I learned: if you're using the camera, add start_x=1 to /boot/config.txt and increase gpu_mem=256. This prevents random camera disconnects.
Common Pitfalls I've Hit (and How to Avoid Them)
- Out of memory: The Pi 5's 8GB is generous, but large models can still OOM. Use
free -hto monitor. If you're close to 7GB used, reduce batch size or use a smaller model. - Thermal throttling: Without active cooling, the Pi 5 throttles at 85°C. My inference speed dropped from 45ms to 120ms when it got hot. Get a fan.
- Slow SD card I/O: Loading models from SD is slow. Use an NVMe SSD via the PCIe slot. I saw model load times drop from 8 seconds to 0.5 seconds.
- Wrong ONNX opset: If you get "Unsupported operator" errors, you probably used an opset that's too old. Stick with opset 17 or newer.
Performance Numbers You Can Expect
Here's what I measured on my Pi 5 (8GB) with active cooling:
| Model | Precision | Inference Time | FPS |
|---|---|---|---|
| ResNet-18 | FP32 | 180 ms | 5.5 |
| ResNet-18 | INT8Related Articles
|